Save to Pinterest
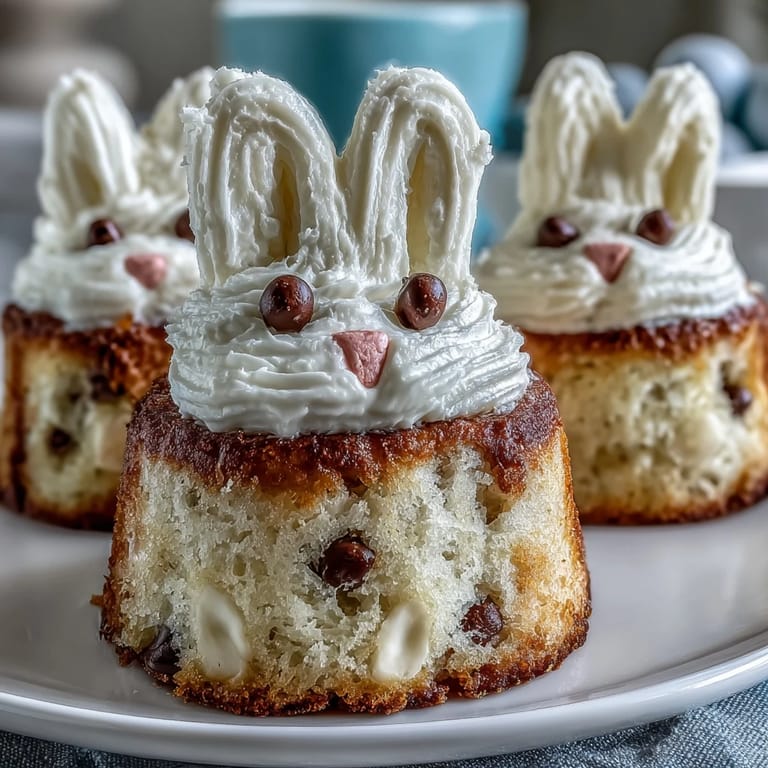
 My daughter burst into the kitchen one March afternoon clutching a bunny-shaped cookie cutter, convinced we could turn cupcakes into actual bunnies for her Easter party. Three hours later, surrounded by buttercream smudges and scattered sprinkles, she'd decorated a dozen little cake bunnies with the focus of a tiny artist. That chaotic afternoon taught me that the best Easter treats aren't fancy, they're the ones that make kids' eyes light up when they recognize themselves in the creation.
I'll never forget watching a shy six-year-old's face transform when she bit into one of these cakes and the marshmallow ears fell off in her lap. She laughed so hard she nearly choked on buttercream, and suddenly the whole table of kids was competing to see whose bunny ears would survive longest before falling off. That's when I realized these cakes weren't really about perfection, they were about creating a memory everyone would giggle about for years.
Ingredients
- All-purpose flour: The foundation of your tender crumb, and 190 grams measured by weight gives you consistency every time.
- Granulated sugar: Don't skip the creaming step with butter, it's where the magic of light, airy cake begins.
- Unsalted butter: Room temperature is non-negotiable here, it traps air and creates that pillowy texture kids love.
- Whole milk: Brings richness without heaviness, though oat or almond milk works if you're accommodating dietary needs.
- Large eggs: Room temperature eggs mix more smoothly and create better structure in the batter.
- Baking powder: Your lift agent, and I learned the hard way that measuring it level, not heaped, makes the difference between fluffy and overdone.
- Pure vanilla extract: The real stuff tastes noticeably warmer and more sophisticated than imitation, worth the splurge for something this simple.
- Powdered sugar: Sift it even if you think it doesn't need it, lumps in buttercream derail the whole frosting project.
- Food coloring: Gel colors are more vibrant than liquid and won't thin your buttercream, a trick that changed my decorating game.
- Mini marshmallows: Choose ones that hold their shape when cut, some brands compress and become unusable.
- Pink candy-coated chocolates: These are your bunny noses, and picking the right shade sets the whole character's personality.
- Mini chocolate chips: Press them firmly into frosting while it's still soft, or they'll roll off mid-display.
Tired of Takeout? 🥡
Get 10 meals you can make faster than delivery arrives. Seriously.
One email. No spam. Unsubscribe anytime.
Instructions
- Prep your tin like you mean it:
- Grease those muffin cups thoroughly or line them with paper, no shortcuts, or you'll spend twenty minutes fishing cake bits out of the pan later. Preheat your oven to 350°F while you gather everything.
- Cream butter and sugar into a cloud:
- This takes about three minutes with an electric mixer, and you'll see the mixture go from pale yellow to almost white as air gets incorporated. Stop when it looks fluffy enough to sink your finger into without resistance.
- Add eggs like you're introducing friends:
- One at a time, waiting for each to fully disappear into the mixture before adding the next. This prevents the batter from looking curdled and lumpy, which happened to me more times than I'd like to admit.
- Build your dry ingredients separately:
- Whisk flour, baking powder, and salt in another bowl, this distributes the leavening evenly. A whisk beats a spoon every time for this job.
- Fold everything together gently:
- Add half the flour mixture, then half the milk, then repeat, ending with flour. The goal is just combined, not overmixed, because overworking develops gluten and makes cakes tough and dense.
- Fill those cups perfectly:
- About two-thirds full is your sweet spot, leaving room for rise without overflow. I use an ice cream scoop for even portions so they all bake at the same speed.
- Bake with patience:
- Eighteen to twenty minutes, and a toothpick inserted into the center should come out clean with maybe one or two crumbs clinging to it. Overbaking by two minutes can make them dry, underbaking leaves a gummy center.
- Cool completely before frosting:
- Warm cakes melt frosting into a puddle, so I set my rack in front of a fan to speed the process. Complete cooling takes about an hour but saves so much frustration.
- Make buttercream that holds its shape:
- Beat softened butter until it's pale and fluffy, then add sifted powdered sugar gradually while mixing. The milk and vanilla come last, and you beat until peaks form that don't immediately collapse.
- Tint thoughtfully:
- Gel food coloring is your friend here, use a toothpick to add just a touch at a time, because you can always add more but can't remove it. I divide my buttercream into small bowls and tint each one separately so I have a whole palette to work with.
- Frost and assemble your bunny characters:
- A generous dollop of frosting on top of each cake, smoothed flat with a spatula or the back of a spoon. This is where the magic becomes visible and the kitchen gets quiet as everyone gathers around to watch.
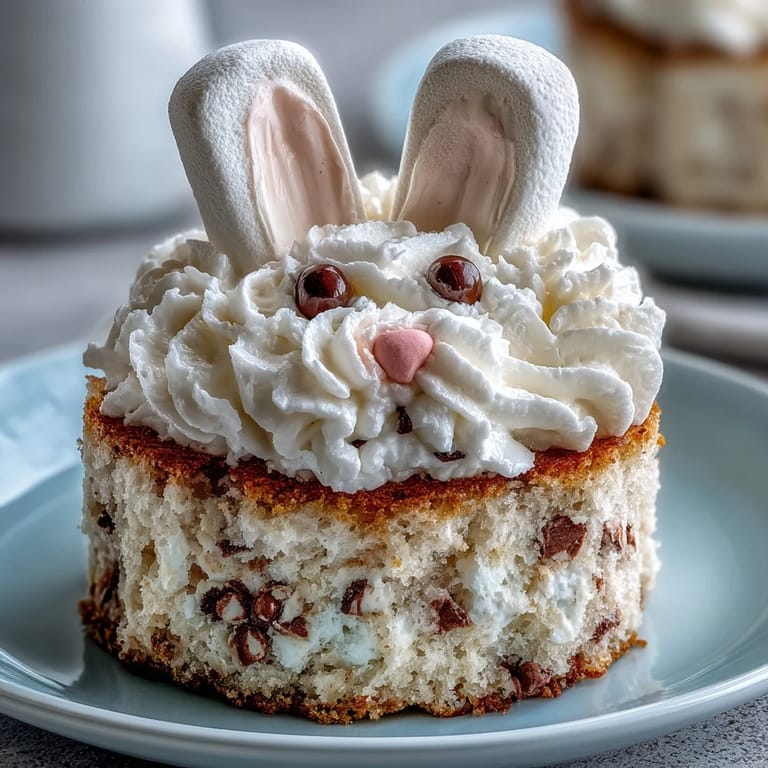
- Build the bunny features:
- Cut marshmallows in half lengthwise for perky ears, press a pink candy into the center for a nose, add chocolate chips for eyes, and suddenly these are personalities not just cakes. A tiny edible marker dot in the eye makes them look directly at whoever's about to eat them.
- Set them on a grassy stage:
- Arrange cakes on a platter scattered with shredded coconut or green sprinkles, and suddenly you've created a whole Easter scene that feels special and intentional.
 Save to Pinterest
 There's something about a table full of kids picking up these silly little bunny cakes and genuinely delighted that their food has a personality. My son bit his bunny's ear off first, announced it was screaming, then ate the rest of the cake while narrating bunny's final adventure, and that absurdity is the whole point of making food fun.
Timing and Make-Ahead Brilliance
These cakes are actually better baked a day ahead because the crumb sets and they're less fragile to frost. I've learned to bake on Friday for a Saturday party, giving the cakes time to cool and settle while I'm doing a hundred other things. The buttercream can be made the morning of, tinted right before assembly, and the whole decoration project can happen while kids are home from school, turning it into an event rather than a solo midnight stress session.
Flavor Customizations Worth Exploring
The vanilla base is neutral enough that you can veer in any direction without losing the bunny charm. Lemon zest mixed into the batter brightens everything, chocolate cake with chocolate buttercream creates a richer celebration, and almond extract swapped for half the vanilla adds a subtle sophistication that adults eating these cakes will absolutely notice. I once made a batch with strawberry milk instead of whole milk and the cakes had this delicate pink hue that made the decoration feel even more cohesive, like the bunny theme was baked in from the start.
Decorating Beyond the Obvious
The marshmallow ears and candy noses are just your starting point, the real fun happens when you lean into what makes each bunny unique. Some get little pink buttercream cheeks, others get fancy bow ties piped with a small tip, one might have a tiny carrot made from an orange gumdrop. I set out small bowls of different candies and let kids choose how to decorate their own bunny, which means no two turn out the same and everyone's invested in the outcome because they made it.
- Edible markers add personality with whisker details or expression changes that make the difference between cute and character.
- White chocolate drizzled over the grass creates a frost effect that photographs beautifully and adds visual interest.
- A tiny fondant flower clutched in the bunny's paws reads as charming and doesn't require special skills to attach.
 Save to Pinterest
 These little bunnies have become my go-to Easter contribution because they feel special without requiring a pastry degree, and honestly, there's something about feeding people food that makes them smile before they even taste it. Make them, enjoy the chaos of decorating, and watch how quickly a simple cake becomes a memory.
Recipe FAQs
- → What ingredients create the bunny decorations?
Mini marshmallows are used for ears, pink candy for noses, mini chocolate chips for eyes, and shredded coconut or sprinkles for grass. White chocolate chips or candy melts can form bunny teeth.
- → How long does it take to bake these mini cakes?
Baking time is approximately 18 to 20 minutes at 350°F (175°C), or until a toothpick inserted comes out clean.
- → Can I substitute ingredients for allergies?
Yes, use dairy-free butter and milk alternatives to accommodate allergies or dietary preferences.
- → What tools are needed for preparation?
You will need mixing bowls, an electric mixer, a muffin tin, cooling rack, piping bags or a spatula, and small scissors for cutting marshmallows.
- → Is it possible to change the cake flavor?
Absolutely, swapping the vanilla sponge for chocolate or other preferred flavors works well with the buttercream and decorations.
- → How should the buttercream be prepared?
Beat softened butter until creamy, gradually add sifted powdered sugar with milk and vanilla, then whip until fluffy. Tint with food coloring if desired.