Save to Pinterest
 My kitchen smelled like butter and possibility last March when my neighbor knocked on the door with a box of green gel food coloring she'd accidentally bought in triplicate. She laughed, held it up like a small green trophy, and said maybe it was a sign to finally make something worthy of St. Patricks Day that didn't come from a box mix. That afternoon, we made these cookies together, watching the dough transform from pale yellow into the most vibrant green either of us had ever created. The sparkly sugar caught the kitchen light in a way that felt genuinely magical, not just festive.
I brought these to a St. Patricks Day potluck where nobody expected much from a dessert table, and they vanished within twenty minutes. A friend told me later that she'd eaten three in a row without thinking—that's when I knew theyd turned into something special. It wasnt just that they were green or sparkly, but that they actually tasted good, which is somehow a revolutionary concept for holiday cookies.
Ingredients
- All-purpose flour: This is your foundation, and sifting it with the baking powder and salt prevents lumps that might affect your cookie texture.
- Unsalted butter: Room temperature is non-negotiable here because cold butter wont cream properly with the sugar, leaving you with dense cookies instead of tender ones.
- Granulated sugar: It dissolves into the dough and helps create that perfect soft yet structured cookie shape.
- Egg: Just one large egg binds everything and adds moisture without making the dough greasy or cakey.
- Vanilla and almond extract: Vanilla is essential, but almond adds a subtle depth that makes people ask what your secret ingredient is.
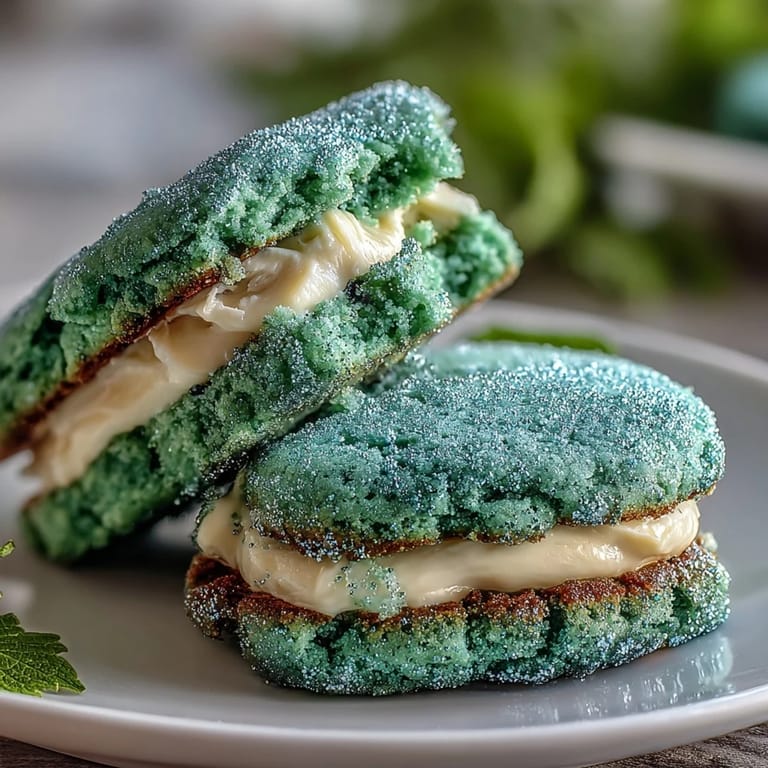
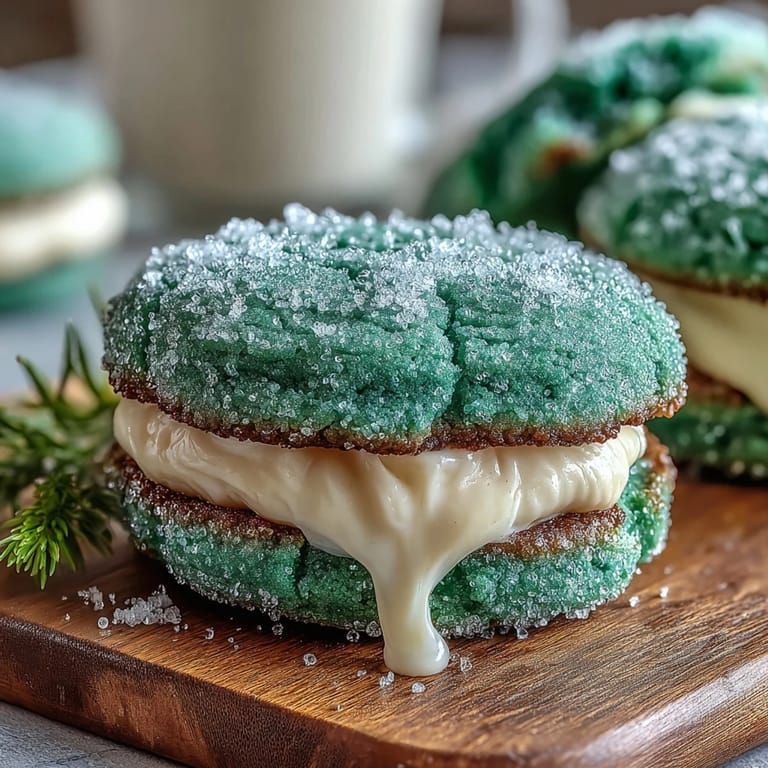
- Green gel food coloring: Gel matters because liquid coloring will thin your dough and make the cookies spread too much during baking.
- Green sparkling sugar: This is where the magic lives—it catches light and makes the cookies look like edible jewelry.
- Powdered sugar and butter for frosting: These two create that cloud-like filling that holds the sandwich together and tastes like vanilla perfection.
Tired of Takeout? 🥡
Get 10 meals you can make faster than delivery arrives. Seriously.
One email. No spam. Unsubscribe anytime.
Instructions
- Set yourself up for success:
- Preheat your oven to 350°F and line two baking sheets with parchment paper while you gather your ingredients. This takes two minutes and saves you from the panic of a fully mixed dough while youre still hunting for baking powder.
- Mix your dry team:
- Whisk flour, baking powder, and salt together in a medium bowl—this distributes the leavening evenly throughout so every cookie rises the same way.
- Cream the butter and sugar:
- Beat them together for two to three minutes until the mixture looks pale and fluffy, almost like soft mousse. This step incorporates air and creates the tender crumb youre after.
- Add the wet ingredients:
- Beat in your egg, vanilla, and almond extract until everything is smooth and cohesive—this only takes about a minute.
- Go green:
- Add your gel food coloring a few drops at a time, blending after each addition until you reach your desired shade. Its better to build the color gradually than to overshoot and end up with neon cookies.
- Bring it together:
- Gradually mix in the dry ingredients until a soft dough forms—stop mixing once you dont see streaks of flour because overworking develops gluten and makes cookies tough.
- Make sparkly balls:
- Scoop tablespoon-sized portions of dough, roll them between your palms, then roll each ball in the green sparkling sugar until its completely coated. The sugar sticks better to the outside of the dough than if you try to mix it in.
- Space and flatten:
- Place the balls two inches apart on your prepared baking sheets, then gently flatten each one with your palm until its about a quarter-inch thick. Youre not making them paper-thin; theyll still be puffy.
- Bake with intention:
- Bake for nine to eleven minutes—youre looking for set edges but centers that still yield slightly to pressure. They firm up as they cool, so resist the urge to bake them until theyre totally rigid.
- Make the frosting:
- Beat softened butter until creamy, then gradually add sifted powdered sugar, milk, vanilla, and a pinch of salt. The sifting prevents lumps that feel gritty between your teeth.
- Assemble the sandwiches:
- Spread or pipe a generous layer of frosting onto the flat side of half the cookies, then top with remaining cookies to form sandwiches. If youre feeling fancy, roll the frosting-exposed edges in extra sparkling sugar for a completely glittery finish.
 Save to Pinterest
 There was a moment while frosting these where my hands got slightly sticky and I realized I was genuinely enjoying the process instead of rushing through it. That shift—from task to actual presence—is what these cookies do. Theyre not complicated enough to stress you out, but theyre interesting enough that you stay engaged the whole way through.
Why These Become Gifts
These cookies sit in that perfect sweet spot where they look like you spent hours perfecting them but actually came together in less time than it takes to watch a streaming show. Thats the kind of recipe people remember because youll hand them a box and theyll immediately want to know how you made something that beautiful. The combination of soft cookie and creamy filling is nostalgic without feeling tired, and the sparkle makes them feel like you put genuine thought into the presentation.
Storage and Keeping
These keep beautifully in an airtight container at room temperature for up to three days, though honestly they rarely last that long. If you need them to last longer, you can freeze the unfilled cookies for up to two weeks and frosting them the day you want to serve them. The frosting acts as a protective seal, so assembled sandwiches actually keep better than individual cookies sitting alone.
Variations That Work
Once you master the base recipe, you can pivot in so many directions while keeping that same structure. The dough takes different extracts beautifully, and the frosting is your canvas for flavor experimentation. Here are some directions worth trying:
- Add a few drops of peppermint extract to either the dough or frosting for a festive twist that feels like the holidays made edible.
- Swap the almond extract for coconut extract and use white sparkling sugar with a hint of green gel for a subtler appearance that still reads celebratory.
- Make the frosting with a teaspoon of lemon zest and lemon juice instead of milk for a bright, tangy filling that balances the sweetness.
 Save to Pinterest
 These cookies transformed my St. Patricks Day from feeling obligatory to actually festive, which is worth more than any recipe should promise. Make them once and theyll become your annual tradition.
Recipe FAQs
- → What gives these cookies their vibrant green color?
Green gel food coloring is used to create a bright and consistent green shade without affecting dough consistency.
- → How is the sparkling sugar applied?
Cookie dough balls are rolled in green sparkling sugar before baking, adding texture and a festive shimmer.
- → What makes the cookies soft rather than crisp?
The balance of butter, sugar, and careful baking time ensures a tender, soft texture rather than a crunchy bite.
- → Can the vanilla frosting be modified for different flavors?
Yes, adding peppermint extract or other flavorings to the frosting can create a festive variation.
- → How should the cookies be stored for freshness?
Store the assembled cookies in an airtight container at room temperature for up to three days to maintain freshness and texture.