 Save to Pinterest
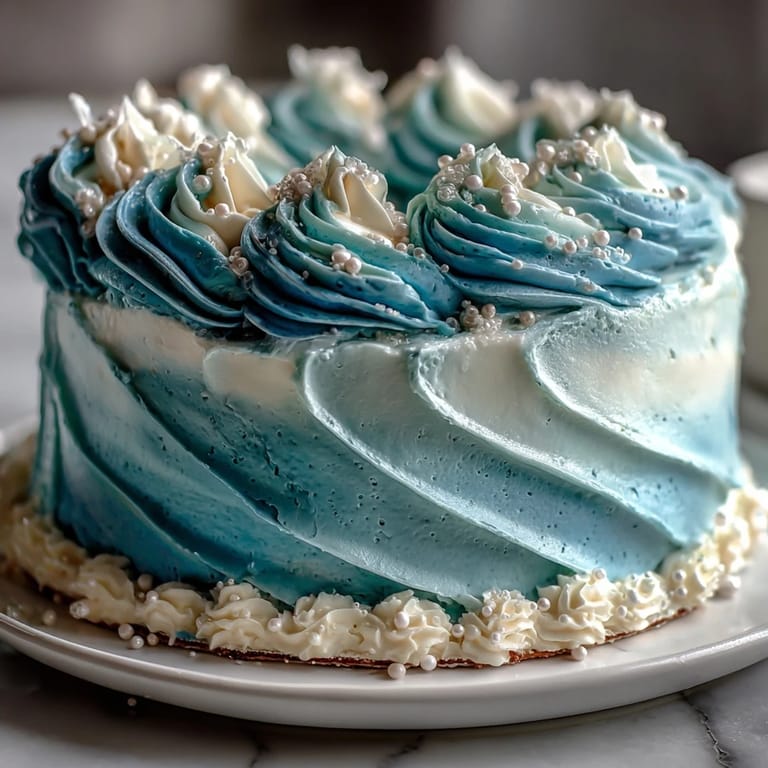
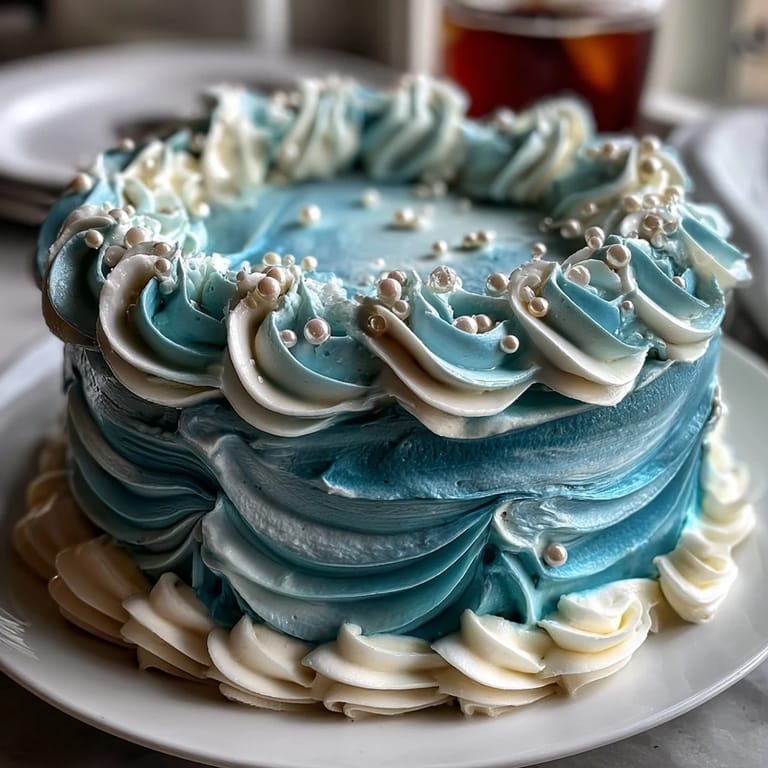
 My sister texted me a photo of a Pisces necklace she'd bought, and something about the way the waves caught the light made me want to bake something that captured that same dreamy, oceanic feeling. I'd never decorated a cake with intentional wave patterns before, but the idea of layering blues and whites on a sheet cake felt like painting the zodiac onto something edible. The vanilla sponge would be soft enough to hold all that buttercream without crumbling, and watching the colors blend together during decorating turned out to be oddly meditative. This cake became my way of turning baking into something a little more personal than just following instructions.
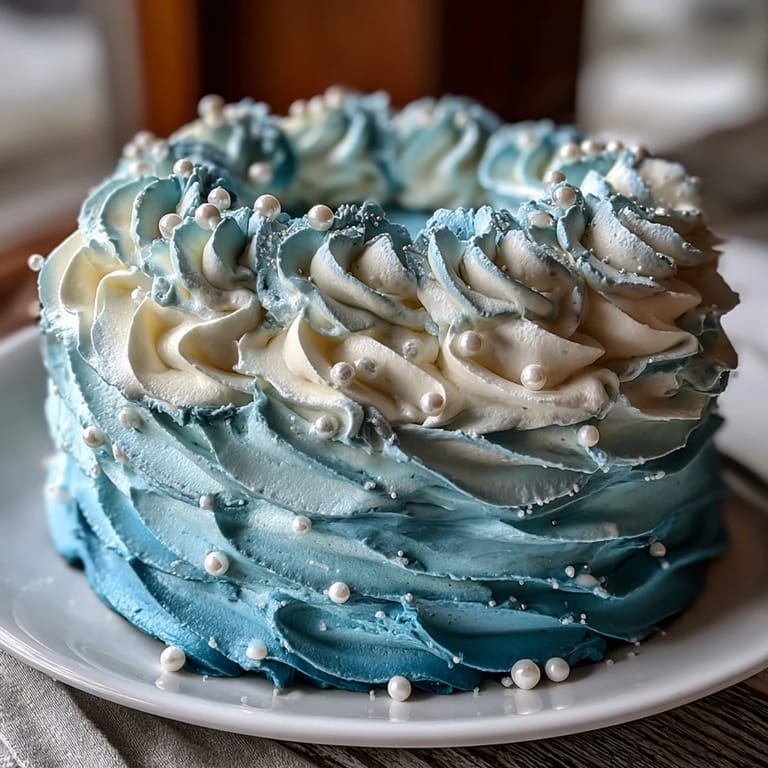
I made this for my best friend's birthday, and the moment she saw those gradient blues, she gasped in a way that made all the piping feel worth it. She's a Pisces, obviously, and I watched her trace her finger along the white foam waves before cutting into it, like she was reading the cake the way someone reads tarot cards. Sharing something you've decorated with that much intention hits different than just handing someone a box cake.
Ingredients
- All-purpose flour (2 ½ cups): Make sure it's measured by weight if possible, or spoon and level it gently to avoid packing it down.
- Baking powder (2 ½ tsp): Check the expiration date because old baking powder won't give you that tender crumb you're after.
- Salt (½ tsp): This isn't just seasoning, it balances the sweetness and makes the vanilla taste like itself.
- Unsalted butter (1 cup plus 1 ½ cups): Room temperature is non-negotiable here, or your batter will split and your frosting will be grainy.
- Granulated sugar (1 ¾ cups): This creams with the butter to add lift and tenderness to the cake.
- Large eggs (4), room temperature: Cold eggs won't incorporate properly and can cause a dense crumb.
- Pure vanilla extract (1 tbsp plus 2 tsp): The good stuff makes a real difference in vanilla cakes where it's the main flavor.
- Whole milk (1 cup plus ¼ cup), room temperature: Cold milk can seize the batter, so let it sit on the counter beforehand.
- Powdered sugar, sifted (5 cups): Sifting removes lumps so your frosting stays smooth and spreadable.
- Blue gel food coloring: Gel is concentrated, so a little goes a long way without watering down your frosting.
- White gel food coloring: Optional, but it makes whites brighter and more intentional looking.
- Edible pearls or sugar pearls: These add a subtle shimmer that catches light like the ocean actually does.
Tired of Takeout? 🥡
Get 10 meals you can make faster than delivery arrives. Seriously.
One email. No spam. Unsubscribe anytime.
Instructions
- Heat and prep:
- Preheat your oven to 350°F and grease that 9x13 pan generously, then line it with parchment so the cake releases easily. Setting this up first means you won't scramble later when the batter's ready.
- Combine dry ingredients:
- In a medium bowl, whisk your flour, baking powder, and salt together, making sure everything is evenly distributed. This pre-mixing prevents lumps from forming once you add the wet ingredients.
- Cream butter and sugar:
- Beat them together for a full 3 minutes until the mixture looks pale and fluffy, almost like fluffy clouds. This is where the cake gets its tender crumb, so don't rush it.
- Add eggs and vanilla:
- Drop in one egg at a time, beating well after each addition so everything stays emulsified and smooth. Once all four are in, add the vanilla and mix until the batter looks silky.
- Alternate wet and dry:
- Add about a third of the flour mixture, then half the milk, then another third of flour, then the rest of the milk, and finish with the last of the flour. This method keeps the batter from becoming tough or breaking.
- Bake the cake:
- Pour into your prepared pan, smooth the top gently with a spatula, and bake for 28-32 minutes until a toothpick comes out clean. The kitchen will smell incredible, and that's how you know it's working.
- Cool with patience:
- Let it sit in the pan for 10 minutes so the structure sets, then transfer it to a wire rack to cool completely. Decorating a warm cake is a recipe for buttercream disaster.
- Make the buttercream:
- Beat softened butter for about 2 minutes until it's creamy, then gradually add powdered sugar on low speed so you don't create a cloud of sugar dust. Add vanilla and milk, then beat until it's light and fluffy enough to hold peaks.
- Create your color palette:
- Divide the frosting into 3-4 bowls and tint each one with blue gel coloring, making shades from deep ocean to pale aqua, and keeping one portion white. Use a toothpick to add color gradually so you don't overshoot.
- Apply the crumb coat:
- Spread a thin layer of white frosting all over the cooled cake to seal in crumbs, then refrigerate for 20 minutes so the next layer adheres cleanly. This step is the difference between a polished look and frosting that fights you.
- Layer the blues:
- Using an offset spatula, apply your blue frostings in swooping wave-like shapes, starting with the darkest shade at the bottom and graduating to lighter shades toward the top. Let each color transition blend slightly for that ombré ocean effect.
- Add sea foam:
- Pipe or swirl white buttercream on top of the waves to mimic sea foam, using a petal tip or round tip for organic looking shapes. The white contrasts beautifully against the blues and finishes the ocean illusion.
- Optional embellishments:
- If you're adding edible pearls or a white chocolate Pisces symbol, place them now while the frosting is still slightly soft so they stick. Let the cake chill for another 15 minutes to set everything in place.
 Save to Pinterest
 I learned later that my friend kept a photo of this cake on her phone for months, showing it to people at work and telling them about the Pisces waves. It made me realize that sometimes the food we make doesn't just get eaten, it becomes part of someone's story for a while.
Flavor Variations to Try
If vanilla feels too straightforward, try adding the zest of one lemon to the cake batter for brightness that won't overpower the buttercream. I've also added a quarter teaspoon of almond extract to half the batter for a subtle nod to marzipan, which pairs beautifully with the ocean theme since almond has that almost salted-sea-air quality to it. You could even infuse the milk with a pinch of sea salt for irony, though that's more of an inside joke than an actual improvement.
Decorating Techniques That Actually Work
The offset spatula is your best friend here because it lets you apply frosting in swooping motions that look intentional and wavy. If you don't have one, the back of a regular spoon works in a pinch, though offset spatulas are cheap and you'll use them constantly after this. The key is to use your whole arm, not just your wrist, and let the motion flow like you're actually painting waves instead of spreading frosting.
Serving and Storage Wisdom
This cake is best served at room temperature so the buttercream stays silky and the cake tastes tender rather than dense. You can make it up to two days ahead, which is honestly perfect because it gives you breathing room if you're baking for an event. Store it covered at room temperature away from direct sunlight so the blue frosting doesn't fade, and pair it with sparkling water or a light dessert wine for maximum ocean vibes.
- Slice with a thin, warm knife dipped in hot water between cuts for clean lines.
- If the buttercream gets too soft while decorating, pop it in the fridge for 10 minutes to firm up.
- Edible pearls can be added even after the cake is fully decorated, so don't stress if you forget them at first.
 Save to Pinterest
 This cake taught me that decorating doesn't have to be intimidating when you pick a theme that feels natural to work with. The ocean waves are forgiving because nothing about the ocean is perfectly symmetrical anyway, so your imperfections just add to the authentic feel.
Recipe FAQs
- → How do I achieve the blue ombré buttercream effect?
Divide your buttercream into separate bowls and tint each with different shades of blue gel food coloring, ranging from dark ocean blue to pale aqua. Apply these layers smoothly in wave shapes for a natural gradient.
- → What is the best way to pipe ocean wave shapes?
Use an offset spatula or piping bags with petal or round tips. Apply the buttercream using swooping motions to mimic the curves and flow of ocean waves on the cake surface.
- → Can I prepare the cake in advance?
Yes, bake and cool the cake fully before decorating. Apply a crumb coat and chill it before adding your final buttercream layers for clean, smooth waves.
- → Are there alternative decorations to edible pearls?
Yes, you can use sugar pearls, white chocolate shapes, or fondant cutouts to complement the aquatic theme and add texture.
- → How can I add extra flavor to the sponge?
Incorporate lemon zest into the batter to give a subtle citrus note that brightens the vanilla flavor profile.