 Save to Pinterest
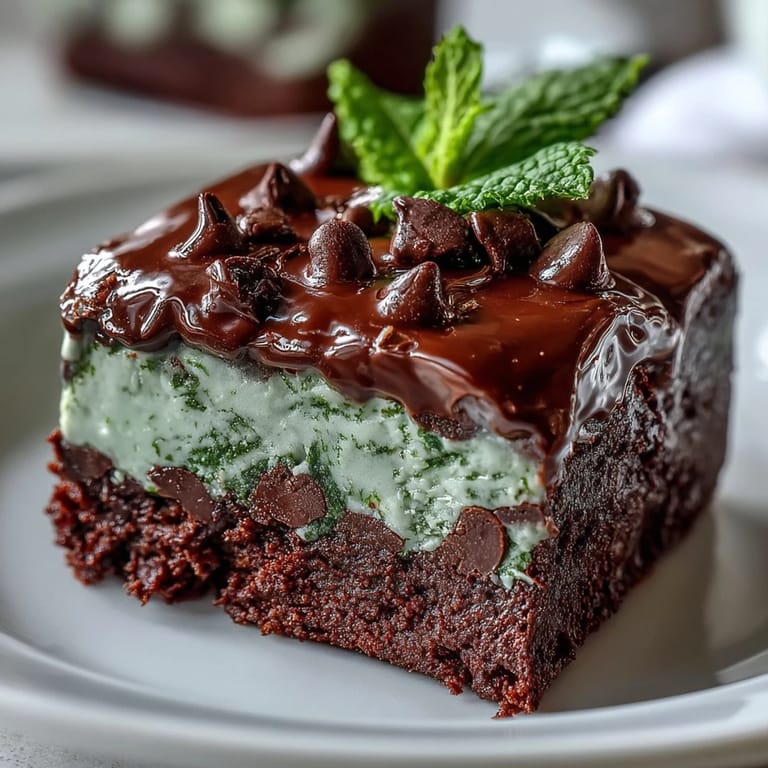
 My sister texted me a photo of these mint chocolate chip brownie bites at 10 PM on March 16th, saying she'd made them for a St. Patrick's Day party and everyone went wild for them. I was skeptical at first—mint and chocolate in brownie form sounded like it could go either way—but the moment I bit into one, I understood the hype. That fudgy center, the cool peppermint whisper, the little chocolate chips creating those pockets of richness: it all just worked. Now they're my go-to when I need something impressive but ridiculously easy.
I brought these to a potluck last March and watched my coworker take a bite, pause for a second, then immediately reach for another one. That hesitation-then-delight moment told me everything—people weren't expecting this flavor pairing to be so balanced and craveable. Since then, they've become my secret weapon dessert, the one thing I can throw together on a random Tuesday and have everyone ask for the recipe.
Ingredients
- All-purpose flour: A quarter cup gets whisked with cocoa powder to create that tender, not-cakey crumb; don't skip sifting if your flour seems compacted.
- Unsweetened cocoa powder: This is non-negotiable—it's where the deep chocolate flavor lives, so grab good quality if you can.
- Baking powder: Just a touch keeps these from being dense little hockey pucks, giving them that slightly cakey-fudgy hybrid texture.
- Salt: A quarter teaspoon might seem small, but it awakens the chocolate and balances the sugar beautifully.
- Unsalted butter: Melted and cooled slightly before mixing ensures it blends smoothly without cooking the eggs.
- Granulated sugar: One cup might sound like a lot, but it's what makes these bites stay fudgy in the center rather than drying out.
- Eggs: Room temperature eggs blend in easier and create a silkier batter that bakes up tender.
- Vanilla extract: Use real vanilla if you have it; it rounds out the chocolate without announcing itself.
- Peppermint extract: Half a teaspoon is the sweet spot—enough to taste refreshing without making your mouth feel like a candy cane.
- Green food coloring: Completely optional but adds that festive St. Patrick's Day spirit if you're in the mood for it.
- Mini chocolate chips: These distribute chocolate flavor throughout every bite; regular chips work too but get less evenly distributed.
- Andes mints or mint chocolate pieces: Chopped up, these add pockets of extra mint intensity, though you can absolutely skip them for a simpler version.
Tired of Takeout? 🥡
Get 10 meals you can make faster than delivery arrives. Seriously.
One email. No spam. Unsubscribe anytime.
Instructions
- Get your oven and tin ready:
- Preheat to 350°F and either grease your mini muffin tin with a little butter or slip those liners in—they make cleanup infinitely easier and help the bites release cleanly.
- Mix the dry team:
- Whisk flour, cocoa powder, baking powder, and salt in a medium bowl until you don't see any cocoa streaks. This distributes the leavening evenly so every bite has that light, tender texture.
- Cream the wet mixture:
- In a larger bowl, whisk melted butter and sugar together until combined, then add eggs, vanilla, and peppermint extract. The mixture should look smooth and slightly thick; if you're using food coloring, add it now.
- Fold it all together:
- Gently fold the dry mixture into the wet until just combined—don't overmix or the brownie bites will turn tough. You'll have a batter that looks rich and chocolatey with no visible flour streaks.
- Add the chocolate moments:
- Stir in mini chocolate chips and chopped Andes mints if using, then spoon the batter into each cup about three-quarters full. Top with a few extra chocolate chips for a pretty finish.
- Bake with confidence:
- Pop them in for 13 to 15 minutes—the toothpick test is your friend, but you want mostly clean with a few moist crumbs, not completely dry. They'll continue cooking slightly as they cool.
- Cool and release:
- Let them sit in the tin for 5 minutes so they firm up enough to handle, then turn them onto a wire rack to cool completely. This prevents condensation from making them soggy on the bottom.
 Save to Pinterest
 There was this one time I made a batch and forgot I'd already added the peppermint extract, so I added it again. The resulting bites were aggressively minty in a way that honestly taught me something valuable—sometimes too much of a good thing is just overwhelming. Now I'm thoughtful about measuring, but also confident enough to know that half a teaspoon is the magic number for that whisper of mint that makes people ask what they're tasting.
The Mint-Chocolate Science
Peppermint and chocolate have this almost magical relationship that I didn't fully understand until I started playing with these ratios. The coolness of the mint actually makes the chocolate taste more intense and complex, while the chocolate keeps the mint from feeling sharp or medicinal. It's a balance that took me a few batches to nail, but once I got it, I realized why this flavor pairing shows up everywhere from candy canes to ice cream.
Storage and Make-Ahead Magic
These bites keep beautifully in an airtight container for up to five days, and honestly, they taste just as good on day four as they do fresh. I've also made the batter the night before and refrigerated it overnight, then baked them the next afternoon—this actually makes them slightly more fudgy because the cocoa has time to fully hydrate. If you're thinking ahead for a party or gathering, you can make them two days in advance and store them at room temperature, pulling them out right before serving.
Customization and Variations
The beauty of this recipe is how flexible it is once you understand the base. I've swapped Andes mints for other mint-chocolate bars, tried almond extract instead of vanilla for a different flavor profile, and even doubled the cocoa powder when I wanted an extra-dark brownie. The green food coloring is purely aesthetic, so skip it if you prefer, but it does add that festive touch that makes them feel special for a St. Patrick's Day gathering.
- If you can't find peppermint extract, crush up a few Andes mints and mix them into the batter instead, reducing the amount slightly to avoid excess moisture.
- For a dairy-free version, use melted coconut oil instead of butter and dairy-free chocolate chips, though the flavor will be slightly different.
- Store these in the fridge if your kitchen runs warm, and let them come to room temperature for a few minutes before eating so the fudgy center really shines.
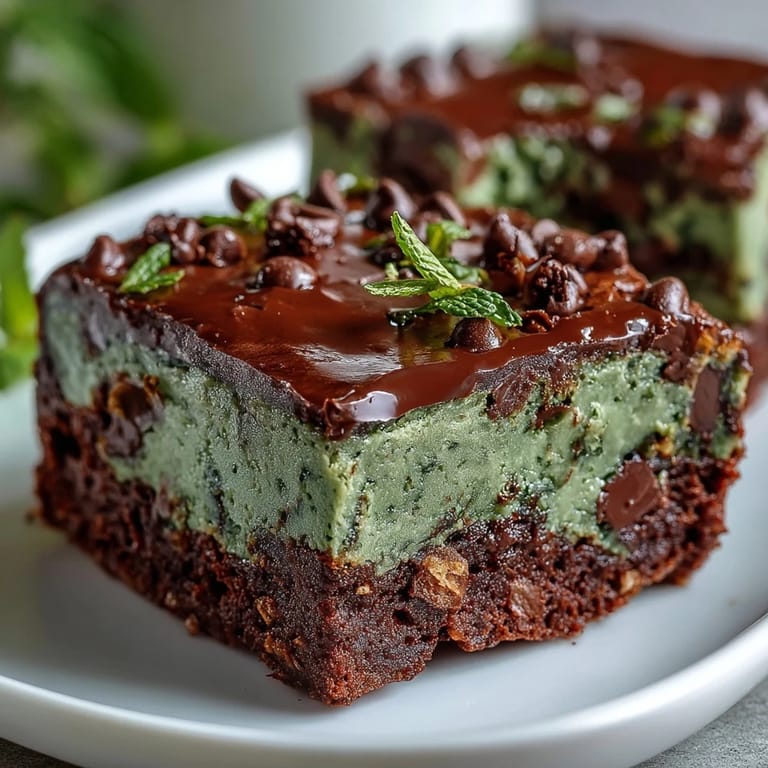 Save to Pinterest
 There's something genuinely satisfying about pulling a batch of these tiny brownie bites from the oven on a gray March afternoon, knowing you've created something that tastes way more impressive than the 35 minutes it took. They remind me that sometimes the best treats don't require fussy techniques or fancy ingredients, just thoughtful flavor combinations and a little confidence in the kitchen.
Recipe FAQs
- → Can I omit the green food coloring?
Yes, the green coloring is optional and mainly for festive appearance; the flavor remains delicious without it.
- → What can I substitute for Andes mints?
You can use mint-flavored chocolate bars or simply omit them for a classic mint chocolate chip texture.
- → How do I know when the bites are done baking?
Insert a toothpick in the center; it should come out mostly clean with a few moist crumbs for optimal fudginess.
- → Can these bites be stored after baking?
Store in an airtight container at room temperature for up to five days to maintain freshness.
- → Is it possible to increase the mint flavor?
Yes, you can slightly increase the peppermint extract, but take care not to overpower the chocolate base.