 Save to Pinterest
 My cousin called me three weeks before her graduation, voice trembling with excitement and a hint of panic. She was a Taurus, turning twenty-two, and wanted a cake that felt like her—grounded, beautiful, and unapologetically bold. I'd never decorated a tiered cake with piped florals before, but something about the challenge pulled me in. Standing in my kitchen that Saturday morning, flour dust catching the light, I realized this wasn't just about baking; it was about translating a moment of triumph into something edible and lasting.
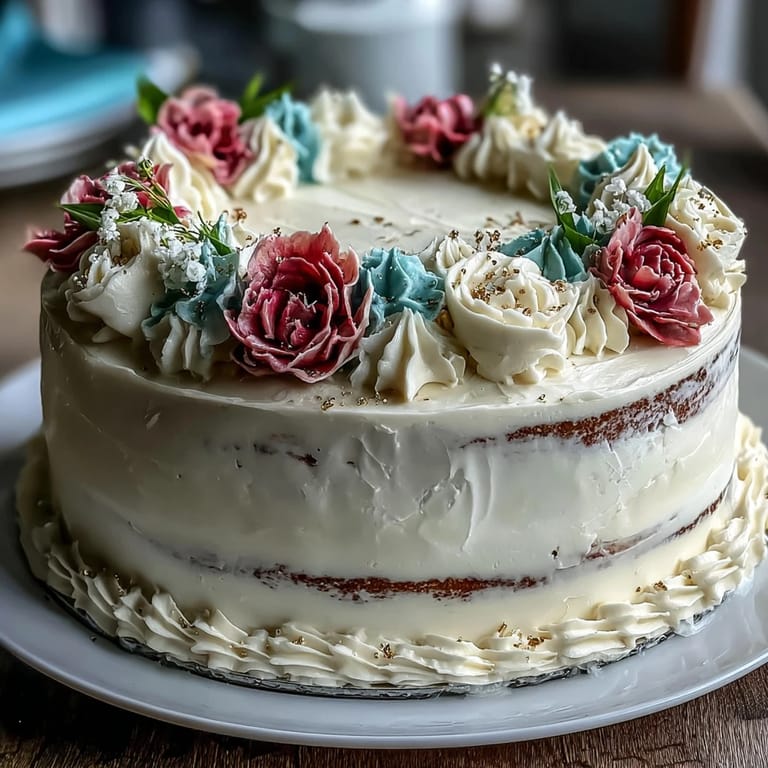
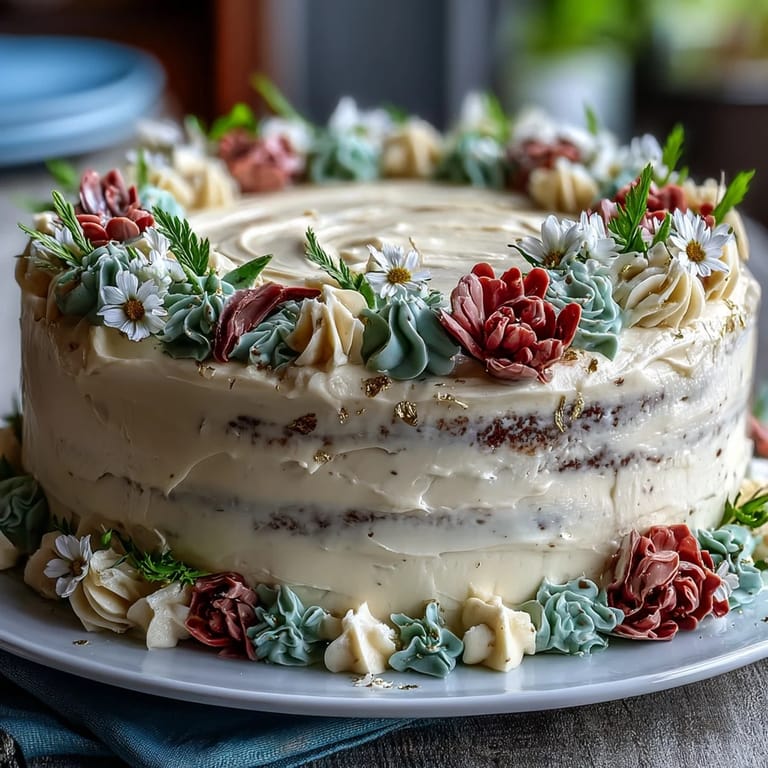
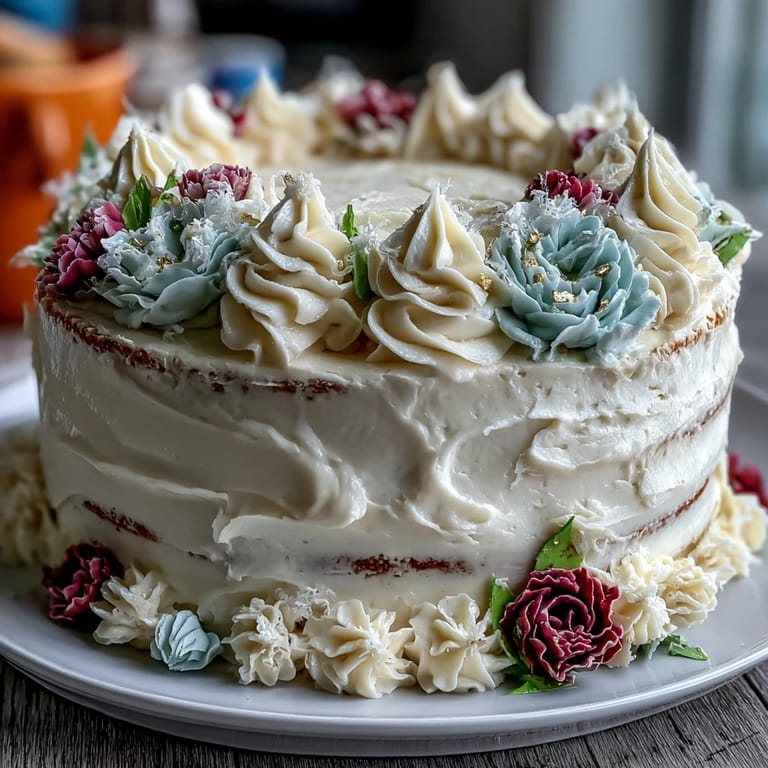
I'll never forget the moment my cousin walked into her graduation party and saw the cake sitting on the dessert table. The three layers were stacked high, crowned with piped roses in dusty pink and lavender, green leaves curling around the sides, and a tiny gold Taurus symbol catching the light. She gasped—actually gasped—before hugging me so tight I got buttercream on her cap and gown. That's when I understood: a cake for a milestone isn't really cake at all; it's edible proof that someone saw you and made something beautiful just for you.
Ingredients
- All-purpose flour (2 1/2 cups): This is your structural foundation, and sifting it with the baking powder and salt ensures even distribution of leavening so your cake rises uniformly without dense pockets.
- Baking powder (2 1/2 tsp): The unsung hero that gives you that cloud-like crumb; don't skip checking the expiration date because stale baking powder means a flat, sad cake.
- Salt (1/2 tsp): Barely there, but it sharpens the vanilla flavor and prevents that one-dimensional sweetness that makes store-bought cakes taste artificial.
- Unsalted butter (1 cup for cake, 1 1/2 cups for frosting): Room temperature is non-negotiable; cold butter won't cream properly, and you'll end up with a dense, greasy cake that no amount of piping can save.
- Granulated sugar (2 cups): Creaming this with butter creates tiny air pockets that become delicate crumbs when baked, so don't rush the beating stage—give it a full 3 to 4 minutes.
- Eggs (4 large, room temperature): Cold eggs won't incorporate smoothly and can actually cause the batter to break; take them out of the fridge while you're prepping other ingredients.
- Pure vanilla extract (1 tbsp for cake, 2 tsp for frosting): Real vanilla makes an enormous difference here; the imitation stuff tastes hollow and slightly chemical against the butter.
- Whole milk (1 cup, room temperature): The fat in whole milk creates a more luxurious crumb than skim, and alternating it with flour creates the silkiest batter texture.
- Powdered sugar (5 cups, sifted): Sifting removes lumps before you beat it in, which takes two extra minutes but prevents grainy frosting that looks dull and feels gritty on your tongue.
- Heavy cream or milk (2 to 4 tbsp): Start with the smaller amount; you can always add more, but too much cream turns frosting greasy and it won't hold piped shapes.
- Gel food coloring (various shades): Gel is denser than liquid, so a tiny drop creates vibrant color without watering down your frosting; those cheap liquid food colorings from the grocery store aisle will sabotage everything you've worked for.
- Edible gold leaf or gold sprinkles (optional): The Taurus symbol detail—this is where you make it personal and celestial, a small touch that says you understood the occasion meant something.
Tired of Takeout? 🥡
Get 10 meals you can make faster than delivery arrives. Seriously.
One email. No spam. Unsubscribe anytime.
Instructions
- Set the stage with heat:
- Preheat your oven to 350°F and grease those three 8-inch pans with parchment paper, because a sticky cake stuck to the pan is a tragedy that haunts you for days. This prep takes five minutes and saves you from disaster.
- Build your dry foundation:
- Whisk flour, baking powder, and salt together in a medium bowl until combined, which aerates the flour and distributes the leavening evenly. I always feel the mixture between my fingers to make sure there are no lumps.
- Cream the butter and sugar into clouds:
- In a large mixer bowl, beat the softened butter and granulated sugar on medium-high speed for exactly 3 to 4 minutes, until it's pale, fluffy, and looks almost like frosting itself. This step is where the magic begins—you're creating an emulsion that will make your cake tender.
- Introduce the eggs one by one:
- Add eggs individually, beating well after each addition so they fully incorporate before you add the next one. If you rush this, the batter can curdle and your cake will be dense and tight.
- Marry wet and dry with grace:
- Alternately add the flour mixture and milk in three batches, starting and ending with flour, mixing just until the streaks disappear. Overmixing develops gluten, which toughens the cake, so stop the moment you see no white flour anymore.
- Fill the pans and smooth:
- Divide the batter evenly among the three prepared pans, using an offset spatula to smooth the tops. Even layers bake evenly and stack without tilting.
- Watch them rise in the oven:
- Bake for 28 to 35 minutes, checking around the 25-minute mark by inserting a toothpick in the center; it should come out clean or with just a few moist crumbs. If you pull them out too early, the centers will sink as they cool.
- Cool with patience and purpose:
- Let the cakes rest in their pans for 10 minutes so they firm up enough to turn out, then transfer them to wire racks to cool completely. Stacking warm cakes is asking for layers that slide apart.
- Make the frosting silk-smooth:
- Beat softened butter on medium speed until it's pale and creamy, then gradually add sifted powdered sugar while beating, which prevents lumps from hiding in your frosting. Add vanilla and 2 tablespoons of cream, then beat for 3 to 4 more minutes until it's fluffy and light.
- Divide and paint with color:
- Split your buttercream into small bowls and tint each one with gel food coloring, stirring gently until the color is even. Keep one bowl white or pale as your base frosting for covering the cake.
- Level, layer, and build:
- If your cake layers domed on top, slice them flat with a serrated knife so they stack straight. Place the first layer on your serving plate, spread buttercream, repeat with the next two layers, and press down gently to set them firmly.
- Crumb coat for protection:
- Apply a thin layer of plain buttercream over the entire cake—this seals in crumbs so your final coat stays pristine. Chill for 20 minutes so this layer sets.
- Apply the final smooth coat:
- Spread a generous, final layer of buttercream over the cake using an offset spatula, working slowly and in one direction so it's smooth and uniform. A turntable is your friend here, letting you rotate while you smooth.
- Pipe your floral vision:
- Fill piping bags with your tinted buttercream and fit them with petal and leaf tips, then pipe roses, peonies, leaves, and vines around the cake. Start at the top and work your way down, and remember that imperfect flowers feel more organic and charming than perfectly symmetrical ones.
- Crown it with meaning:
- Add your Taurus symbol or a tiny graduation cap accent using gold leaf or sprinkles, a detail that makes this cake unmistakably personal. Chill until serving time, and bring to room temperature for 15 to 20 minutes before slicing so the frosting is soft and the flavors open up.
 Save to Pinterest
 Weeks after the graduation party, my cousin texted me a photo of herself in her cap and gown, the cake visible in the background of a family photo. She wrote, "My friends asked who made it. I told them it was someone who knew exactly what I needed." That message sits in my phone still, a reminder that sometimes the best recipes aren't measured in cups and tablespoons, but in the specific love you pour into them.
Why This Cake Feels Special
There's something about a three-layer cake that signals celebration and intention. It's not a quick sheet cake thrown together; it's a statement, a commitment of time and care. The vanilla base is timeless enough that it won't overshadow the decorative elements, letting your piping work be the star. And the buttercream frosting, made with real butter and just the right amount of cream, tastes rich without being overwhelming—it's elegant and nostalgic at the same time, which feels very fitting for marking a major milestone.
Personalizing for Your Celebration
The beauty of this cake is that it's a blank canvas waiting for your story. If the graduate's favorite colors are navy and gold, tint your buttercream accordingly and skip the pink and purple. If they're a different zodiac sign, swap the Taurus symbol for their own constellation or their graduation year in gold. You could pipe their initials, their school's mascot, or even a tiny book if they're heading to graduate school. The structure stays the same; you're just customizing the decoration to match the person being celebrated.
Piping Tips for Beginners and Confident Decorators
The first time I piped flowers onto a cake, I thought they looked amateurish and lumpy. Then I realized that's exactly why they looked beautiful—they had character and movement, not the stiff perfection of a bakery cake. Start with leaves because they're forgiving; a simple curved line with a leaf tip already looks like you know what you're doing. For flowers, a petal tip is your friend—hold the bag at a 45-degree angle and squeeze while moving in a circular motion, and suddenly you have a rose. Don't overthink it.
- Practice piping on parchment paper first, then chill those practice shapes and transfer them to the cake once you feel confident.
- Keep an offset spatula nearby to smooth out any mistakes—a little patience and the right angle can fix almost anything.
- If your piping bag gets too warm and the frosting softens, refrigerate it for five minutes and you're back in business.
 Save to Pinterest
 This cake is more than just dessert; it's a moment frozen in sugar and flour, a way of saying, "Your achievement matters, and so do you." Slice it with confidence and watch people's faces light up when they taste the tender crumb and buttery frosting.
Recipe FAQs
- → How do I achieve smooth vanilla cake layers?
Mix dry ingredients thoroughly, cream butter and sugar until fluffy, beat eggs well, and alternate adding dry mix and milk gently to maintain airiness.
- → What’s the best way to color buttercream for floral designs?
Divide frosting into portions and add gel food coloring gradually, mixing well until reaching desired vibrant floral shades.
- → How can I keep the cake moist?
Avoid overbaking by testing with a toothpick and ensure layers cool completely before frosting to retain moisture.
- → What piping tips are ideal for floral motifs?
Petal, leaf, and round tips create realistic petals, leaves, and stems for intricate floral patterns.
- → Can I prepare decorations ahead of time?
Yes, floral buttercream elements can be piped onto parchment paper, chilled to firm, and transferred to the cake later.